12.07.2018
42 Aero Camino, Goleta, CA
(805) 685-0066
info@biopac.com
www.biopac.com
Tutorial
Congratulations on your BIOPAC
Research System purchase and welcome
to the global community of BIOPAC
researchers and educators. This tutorial is
designed to walk you through the basics of
your AcqKnowledge data acquisition and
analysis software, and includes a variety of
prerecorded sample data files to simulate a
live recording for demonstration purposes.
While it is impossible to cover every
feature of AcqKnowledge software in just
a few pages, many questions can be
addressed by combining this tutorial with
our latest research catalog and the
“AcqKnowledge Software Guide” and
other online support documents (PDF
format) provided in the Help menu and
User Support folder installed to the
AcqKnowledge program directory.
With this tutorial, you’ll be able to
simulate the use of the software for your
particular application. AcqKnowledge is
very flexible and there are usually many
ways to perform different analysis
functions. If you are unclear about how
AcqKnowledge can address your specific
requirements, please contact one of our
Application Specialists for the most
expedient solution, or visit BIOPAC’s
Video Tutorial page for instructional
overviews of many analysis routines and
software features.
Page 2 of 15 AcqKnowledge
®
Basic Questions
What is the MP System?
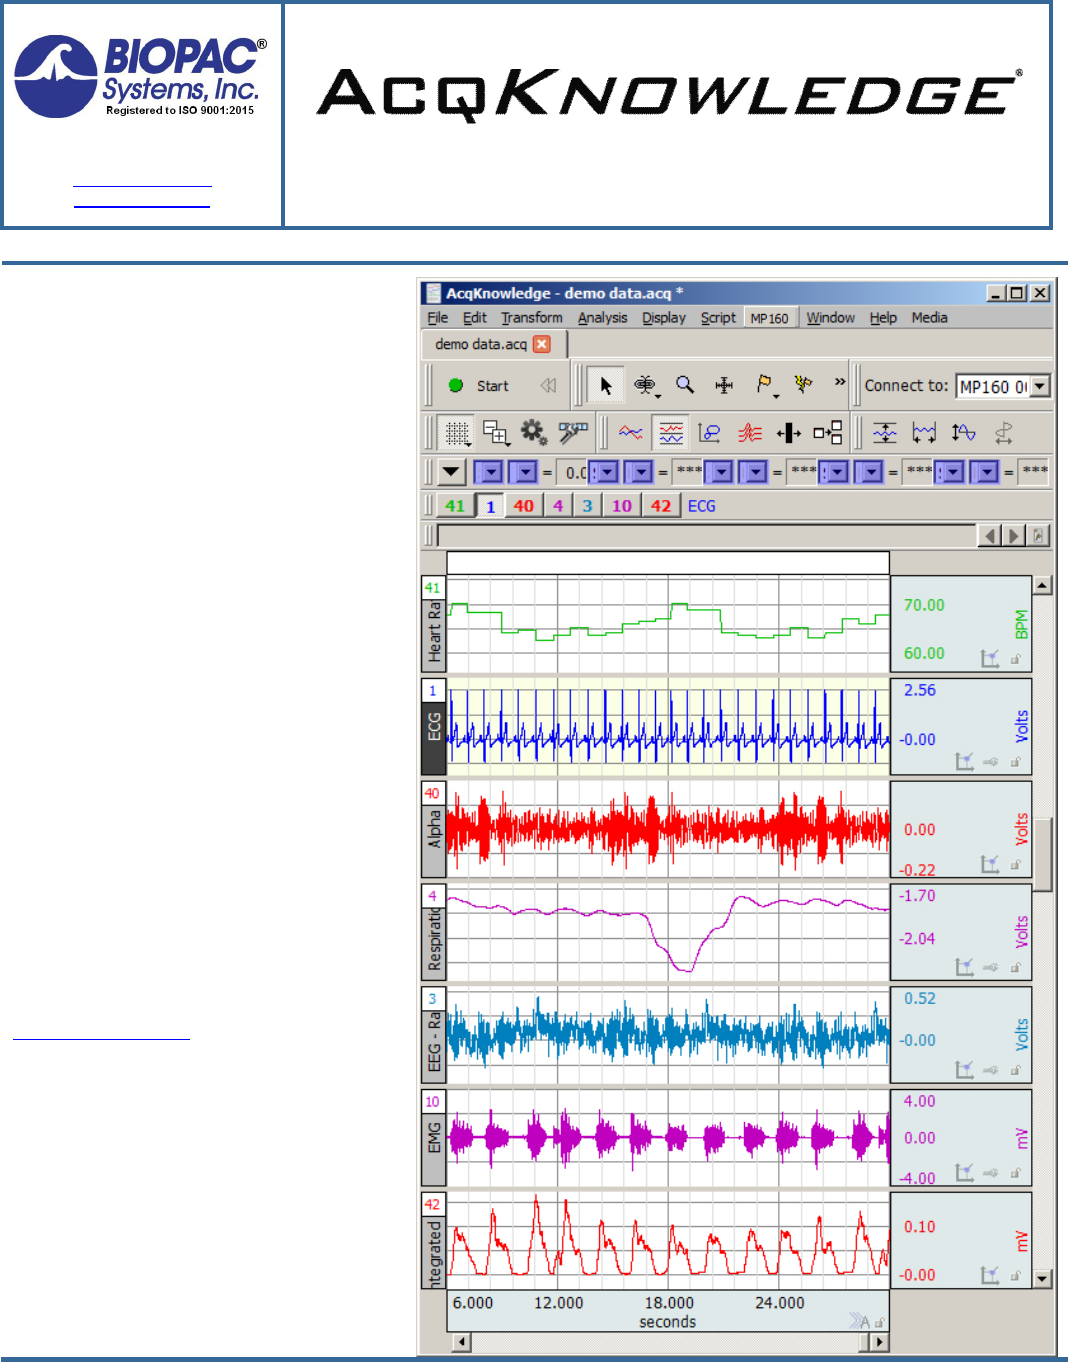
This tutorial and the accompanying demo data highlights the main features of AcqKnowledge by working through
some common applications through the use of included sample data files. You’ll examine specific sections, take
readings, and perform analysis. Sample data files are included for: ECG data, EDA data, EEG data, EMG data,
respiration data, and—for use with the Specialized Analysis Package—Cardiac Output 1, EDA Events, RER, Cardiac
Output 2. Also included are special measurement validation sample data files with spreadsheets configured to
externally verify specific measurement data. All sample data files and preconfigured graph templates can be found in
the Program Data > BIOPAC Systems, Inc. > AcqKnowledge 5.0 > Sample Data folder.
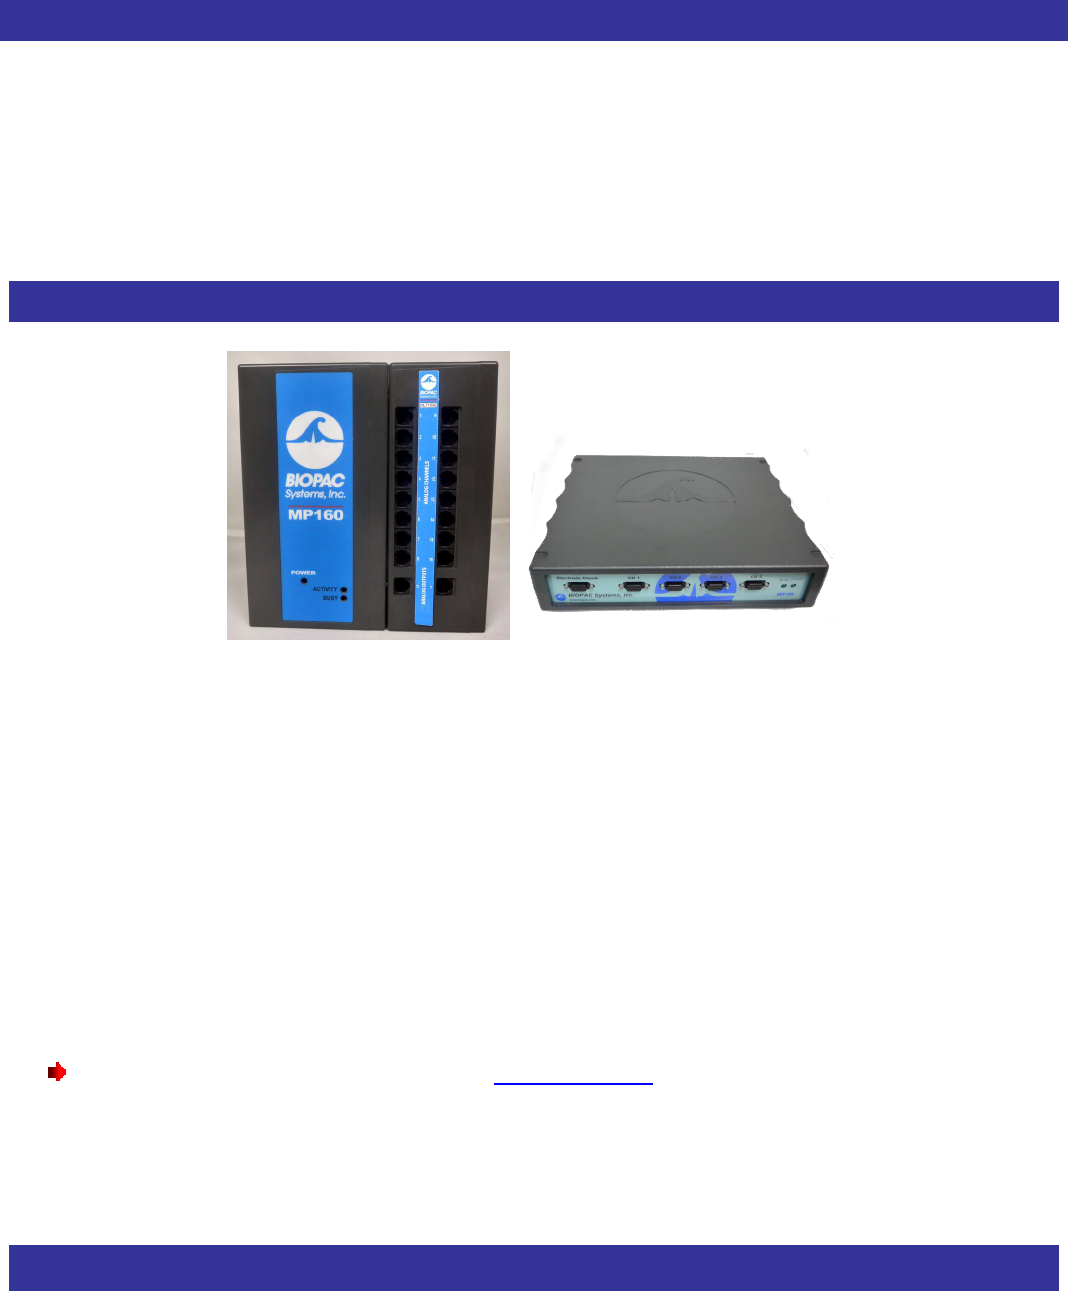
Hardware configurations
MP160 System MP36R System
Workstations include:
§ Data acquisition system that allows you to connect existing equipment such as pre-amplified
electrodes, transducers, blood flow meters, force plates, and chart recorders
§ MP160 acquisition unit with High Level Transducer (HLT100C) module
OR
§ MP36R four-channel data acquisition unit
§ AcqKnowledge® 5.0 software
BIOPAC Systems, Inc. manufactures amplifiers and signal conditioning modules designed to measure an array of life
science data including EMG, respiration, pulse, EEG, temperature, eye movement, skin conductance, evoked
potentials, microelectrode recordings, electrical bioimpedance, laser Doppler flow, CO
2
and O
2
gas analysis, and
electrogastrogram. We also offer a general-purpose amplifier that allows you to connect other devices, including
bridge transducers like pressure, force, and strain gauges. In addition, you can mix and match amplifiers designed to
collect specific kinds of physiological signals (such as ECG, respiration, and EMG). These modules snap together,
allowing you to create a customized data acquisition workstation.
See the full line of research products online at www.biopac.com.
AcqKnowledge® can be used with multiple MP160/150 data acquisition units to
§ control multiple, independent experiments on one computer
§ increase the total number of channels used for a single experiment (e.g., 32-channel EEG)
To synchronize the start of multiple units, use the External Trigger function. To combine up to 60 channels of data
into one file, use the Merge Graphs feature. (See the AcqKnowledge Software Guide or video tutorials for details.)
Efficient Collection
The MP System has several advantages over other recording systems. AcqKnowledge is extremely flexible, giving
you full control over how data is collected. You can analyze data either while it is being acquired or after the fact. The
AcqKnowledge software allows you to perform a range of measurements, calculations, and transformations after the
data has been collected––most can be performed with a click or two of the mouse button. AcqKnowledge includes
over 40 Quick Start graph templates, which include all the settings for a variety of experimental protocols (which
are explained further in our RESEARCH CATALOG):
WWW.BIOPAC.COM Page 3 of 15
www.biopac.com
Let’s begin…
This tutorial demonstrates some of the basic features of the BIOPAC hardware and software. It assumes
AcqKnowledge has been installed, your computer is connected to an MP System, and your KEYLOK license key is
connected to a USB port. If not, please refer to your AcqKnowledge 5 Installation Guide.
To view example data display in a simulated recording, let’s open the AcqKnowledge demo file
for playback:
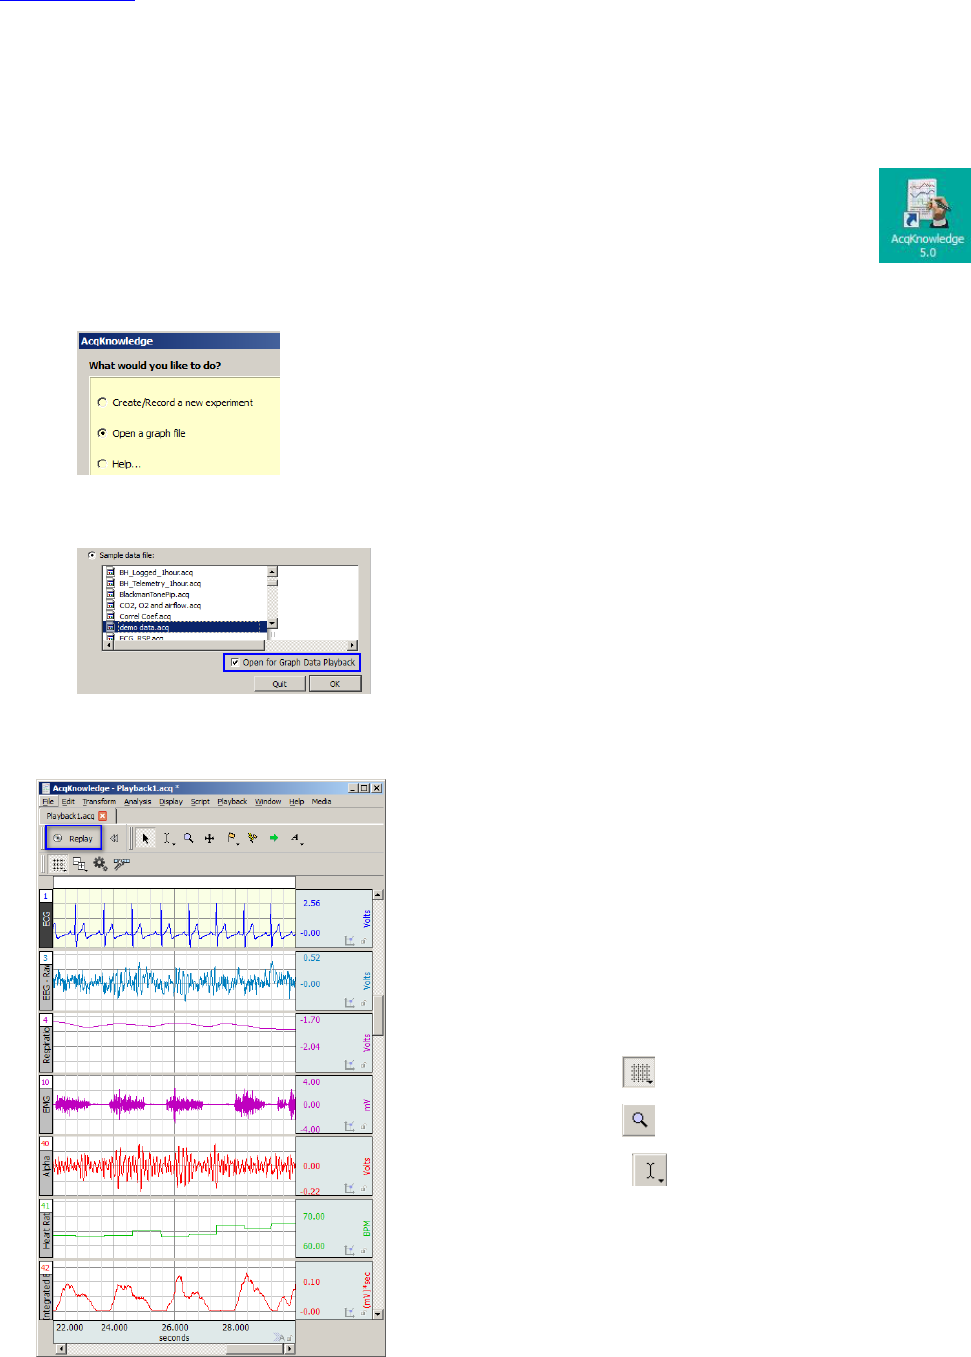
1. Launch AcqKnowledge by clicking the Desktop shortcut. A “Startup Wizard” will
appear, offering a variety of program options.
2. In the Startup Wizard, select “Open a graph file.”
3. Select the “Sample Data File” option. Highlight “demo data.acq” from the Sample data file list (you may have
to scroll down) and check the “Open for Graph Data Playback” option.
4. Click OK. The selected file will open in the AcqKnowledge graph window.
5. Click the “Replay” button in the AcqKnowledge graph window.
Pre-recorded data (taken from an adult male subject) will scroll across
the graph window and the Replay button will be replaced by a Stop
button while the playback is in progress. This is a simulated real-time
data display replicating an actual physiological recording. Data will be
“collected” for 30 seconds—the replay can be interrupted at any time
by clicking the Stop button.
After completing (or stopping) the playback, click “Replay” again to
repeat the simulated recording. (Click “Yes” if prompted to overwrite
the existing data.) The replay will be identical in appearance and length
to the previous data display.
§ Click the grid icon on the toolbar to toggle the grid display.
§ Use the Zoom tool on the toolbar to enlarge an area of data.
§ Use the I-beam tool to select an area of data.
§ Use the Data Acquisition Setup window to modify the duration
and recording mode of the replay (Playback > Set Up Data
Acquisition > Length/Rate). The duration can be increased or
shortened, and the acquisition modes changed. (See page 6 for
more details about acquisition setup.)

Page 4 of 15 AcqKnowledge
®
During recording (or playback of data); note when the data plot
reaches the right edge of the window, the waveforms begin
continuously scrolling from right to left. For long recordings, it
may be desirable to view the data collected earlier in the
acquisition while new data is coming in.
To demonstrate this, disable the AutoPlotting and Scrolling
options on the Playback menu by unchecking the boxes.
Replay the acquisition again.
Now, when the data plot reaches the right limit, the screen will not
be re-written, but the horizontal scroll bar will shift to indicate that
the file length is longer than the visible display.
At this point, you can use the horizontal scroll bar to look back
through the data. Note that the scroll bar position indicator is
changing while data collection is in progress. This indicates that
the record is getting longer as new data is being acquired. You can
reselect AutoPlotting to again view the new data as it is acquired,
and Scrolling as desired.
During long recordings, you may wish to do other tasks on the
computer. By minimizing or resizing the window, the MP System
can be busy collecting data in the background while you're using another program. The MP System software will
never miss any data.
In addition to the ability to collect data in the background, AcqKnowledge also gives you total control over the
channel acquisition parameters. To illustrate this, choose Set Up Data Acquisition > Channels from the Playback
menu. To the left of each channel, the Acquire checkbox enables acquisition, and the Plot checkbox enables plotting.
If Acquire is on but Plot is off, data from that channel will be recorded, but not plotted on the screen. After the data is
recorded, you can turn the channel plotting on by pressing the Option (Mac) or Alt (PC) key and clicking in the
channel boxes at the upper left of the graph window.
The Values checkbox will cause the channel’s current value to be numerically displayed in the Input Values window.
When a channel row is selected, you can set scaling and other parameters. You can edit each channel Label as
desired.
Calculation Channel Presets offer an easy way to apply filters, expressions or
transformations to data in real time. Click the Calculations tab in the Set Up
Channels dialog to activate the Presets menu. Click the (arrow icon) to
generate a list of preset options. Use an existing preset, or modify it to create a new
one. Then, organize the channel presets (via the Playback menu) to suit your needs.
Calculation Presets can only work in conjunction with Analog input presets, or with
other calculation channels that are ultimately pointing to an Analog source channel.
Use Playback menu > Set Up Data Acquisition > Channels > Setup to set the
Source for a Calculation channel.
You can easily translate the voltage read by the MP hardware into the units of the
device being measured. Click the Analog tab in the Set Up Channels dialog and click
the Setup button to generate the Scaling dialog. Enter values and a units label to
convert incoming signals into other units (such as ft/lbs,
millimeters, liters, etc.).
WWW.BIOPAC.COM Page 5 of 15
www.biopac.com
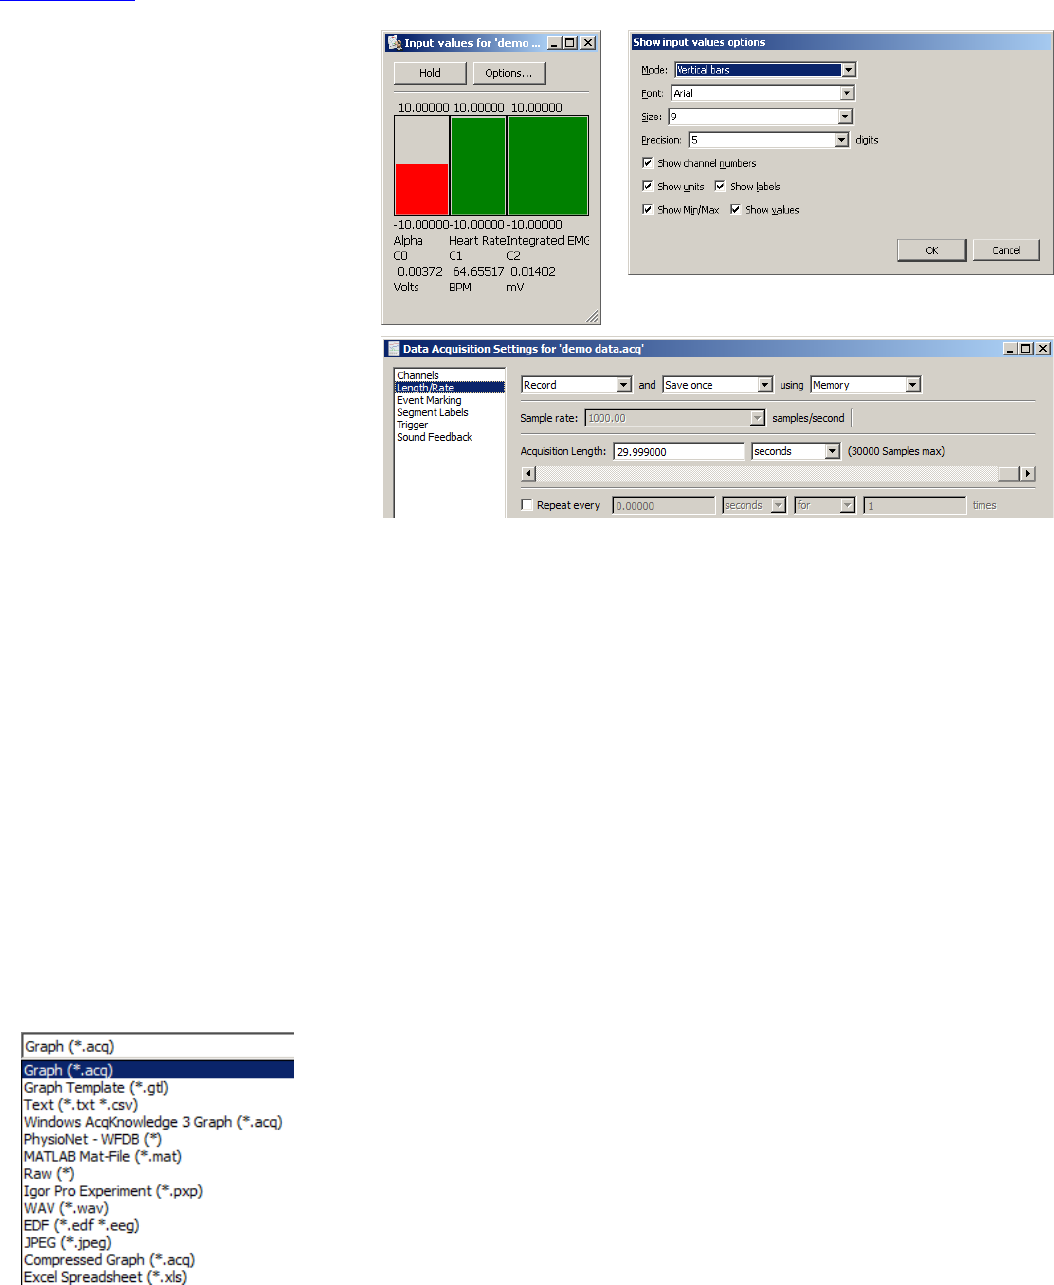
To view the input channel values in
numerical and/or bar chart format, choose
Show Input Values from the Playback
menu. This type of data display is useful
for biofeedback procedures.
Click Options to generate controls for the
size, precision, and format of the values
in the Input values window.
To further control the acquisition, select
Set Up Data Acquisition from the
Playback menu and choose Length/Rate
to generate the Acquisition setup dialog.
This is where you will set up parameters
that control data collection. The basic
options are Acquisition Sample Rate
and Total Length.
· “Sample Rate” sets the frequency at which the data is being recorded in samples per second (Hz). Normally you
would choose a samples/second rate from the pull-down menu but this menu is disabled for the demo, which is
locked to an acquisition sample rate of 1000 samples/second.
· “Acquisition Length” sets the duration of the recording. Adjust the scroll bar or enter the length value directly.
· Units for the length can be set to samples, msec, seconds, minutes, or hours by clicking the pop-up menu to the
right of the Total Length value.
· “Repeat every” is used to set up single or multiple consecutive acquisitions at a user-defined time interval.
Restarting the acquisition by clicking the Replay button will apply any modified settings, although, as previously
stated, the demo is locked to an acquisition sample rate of 1,000 samples/second. The parameters can also be set to
store data to memory, disk, or MP160/150 unit, or, for more sophisticated acquisitions, use signal averaging,
Averaging (the demo is locked to Memory). Any storage medium a file can be copied to can be used (including
removable hard disks and flash drives). For most applications, the MP System is limited only by the computing
environment (system speed, available memory, etc). AcqKnowledge will only let you enter valid parameters.
All acquisition parameters and window positions are saved along with the data when the Save command is chosen.
This feature allows you to open a data file and collect new data without having to reset any parameters. Save As
options include
· Graph (.ACQ) saves data in a binary file format that uses minimal disk space.
· The powerful Graph Template feature lets you save predefined experiment parameters. Just open a Graph
Template (.GTL) and click Start to recreate the protocol and acquire data under the same settings. “Quick
Start” Graph Template files are available for dozens of applications and can be used as a starting point for
customized applications. A sample Quick Start file is installed with the Samples folder (open as Type: Graph
Template).
Page 6 of 15 AcqKnowledge
®
· Compressed will generally achieve about 60% compression. Saving small files (less than 200K) may have little
effect.
· Text (.TXT) is a standard ASCII format that can easily be read by other programs.
· JPEG files can be read by most drawing and word processing programs.
· Matlab uses the “MAT-file” binary format to save numerical and textual information as Filename.mat.
· Excel Spreadsheet File (.XLS) option saves graph data with each channel placed into a spreadsheet column.
· Raw (.RAW) saves data for low-level data exchange with options for data type, layout, and endian byte
ordering.
· With Igor Pro Experiment format (.PXP), the graph is saved to a single packed experiment file, with each
channel saved into a separate Igor wave that preserves the channel label, waveform sampling rate, and unit
information.
Easy Viewing
The AcqKnowledge software makes it easy to display and view your data. The software is designed to provide a clear
interface for working with data and displaying information. AcqKnowledge includes...
§ On-screen measurement tools that can be used to
instantly find a host of measurements, including
minima, maxima, intervals, BPM, and more.
§ Functions that allow you to superimpose, tile,
compress, expand, duplicate, or remove
waveforms.
§ Editing features allow you to cut, copy and paste
data using familiar commands.
§ Built-in ability to view several files on the screen
at the same time.
§ Printing utilities that allow you to produce high-
resolution plots.
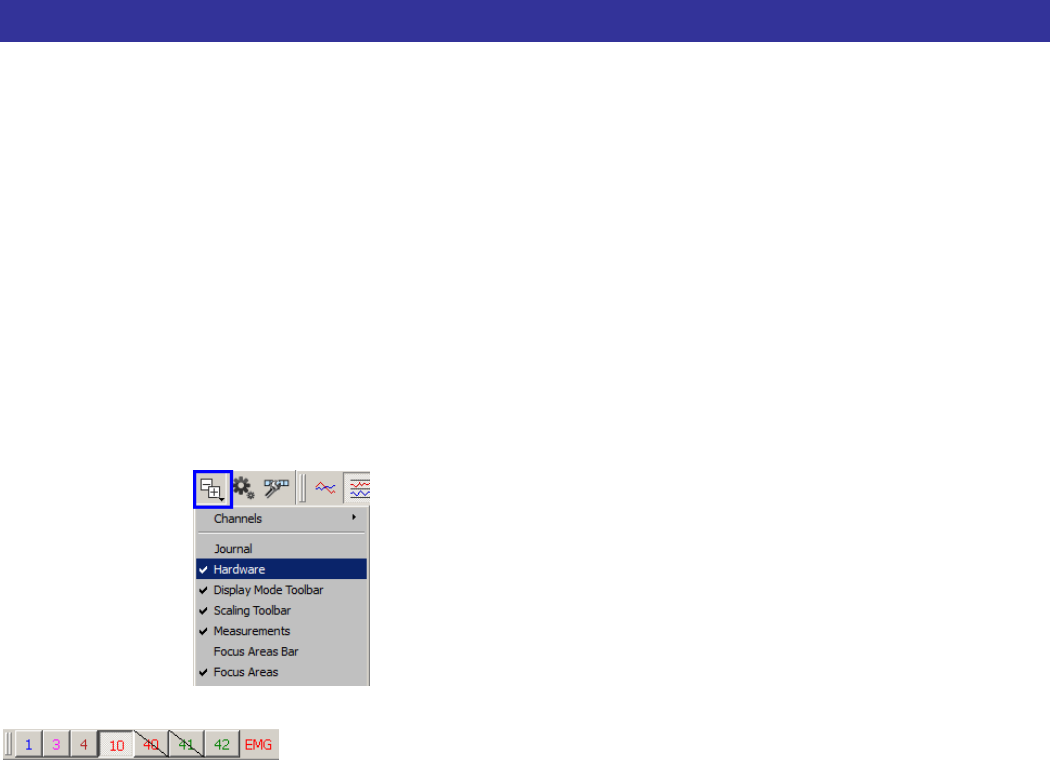
§ Use the display toolbar button to quickly turn
on/off elements and tools in the graph display.
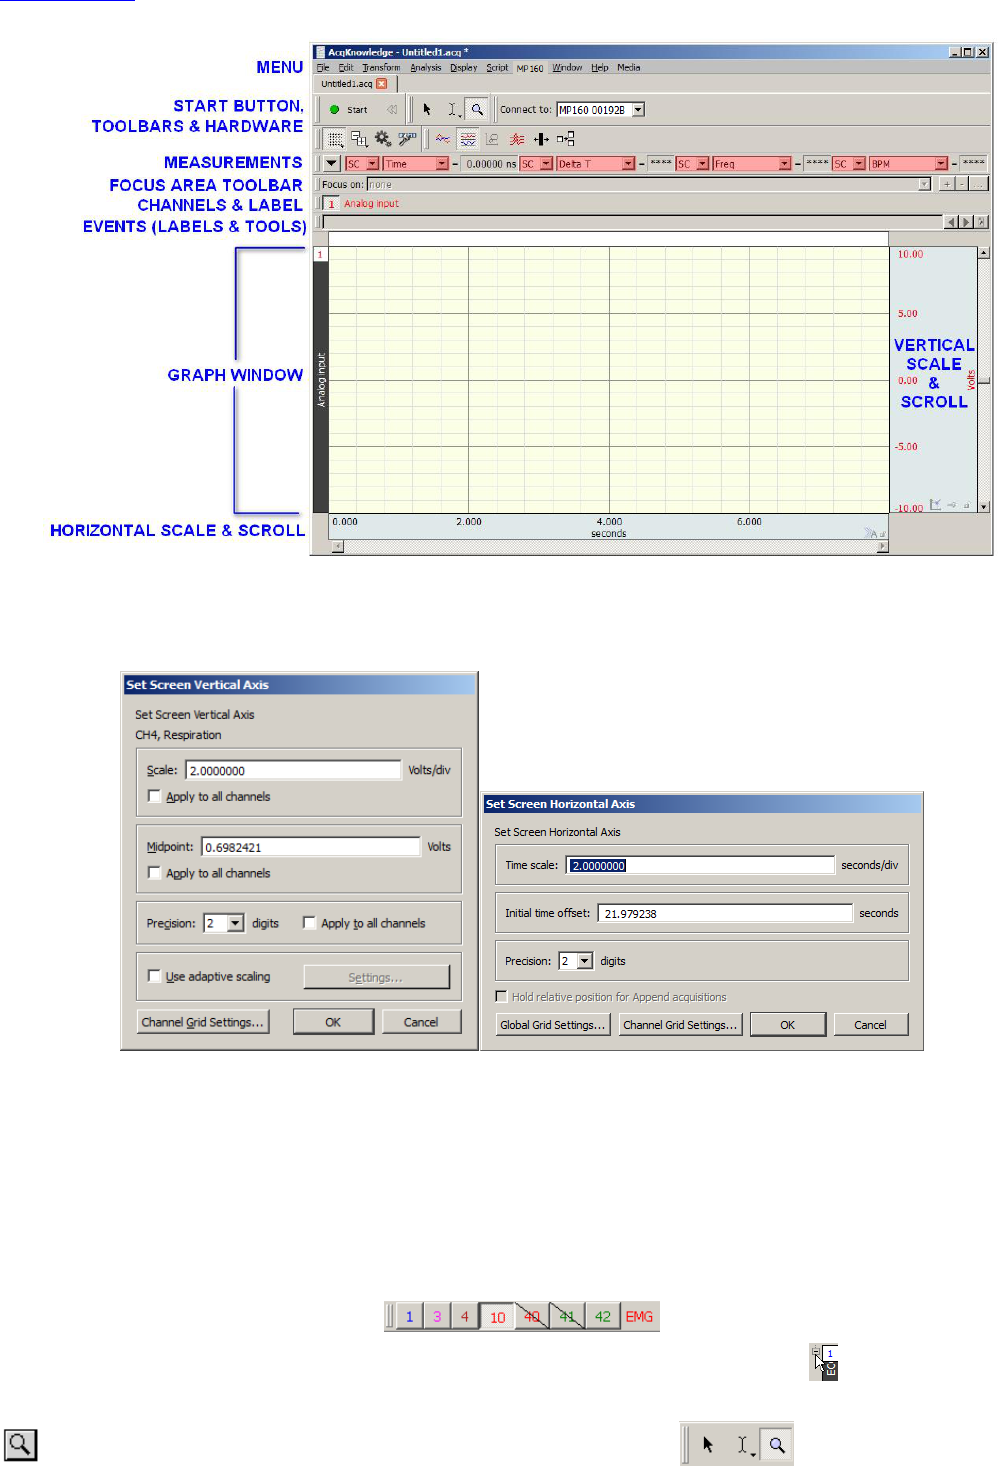
In the upper portion of the acquisition window, a row of small boxes indicate the acquired channels.
The box on the left corresponds to the waveform at the top of the screen. The box that appears depressed is the
selected (or “active”) channel. Only one channel can be selected at a time. The color of each channel’s waveform and
indicator box correspond and can be changed. Measurements can be taken from any channel, while transformations
and editing operations apply to the selected channel or, in some cases, to multiple channels. To select a channel, click
the waveform using the arrow tool. The axis Grid Locks(s) must be locked for the Grid Tool to function on a channel.
The label of the selected channel appears to the right of the channel indicator boxes. The vertical scroll bar adjusts the
vertical offset of the selected channel. You can use it to slide the selected waveform’s scale up or down.
WWW.BIOPAC.COM Page 7 of 15
www.biopac.com
To adjust the vertical scale of the selected channel, click the vertical scale & scroll region. The vertical scale dialog
box will appear. Type in a value roughly half the current value and click OK. The selected waveform’s screen
amplitude will now be twice as large as it was before. You have independent control over each channel.
To display the optimal vertical scale for all channels, choose Display > Autoscale waveforms. (The Autoscale option
can also be accessed by right-clicking inside a channel area on the graph.)
You can also compress or expand the displayed waveforms along the horizontal (time) axis. Simply click anywhere in
the horizontal scale region. The horizontal scale box will appear, allowing any entry. After clicking OK, the screen
will be redrawn with the new time scale setting.
You can temporarily hide channels by clicking a channel’s indicator box (in the upper left of the graph window) while
holding down the Alt (PC) or Option (Mac) key. The box will be slashed, and the display will be redrawn without
this channel. Repeating this operation will cause the waveform to reappear. Multiple channels can be hidden.
Channels can also be hidden by clicking the “-“ button in the upper left of the channel label and unhidden by
clicking the “+” button.
To enlarge a section of interest, use the zoom tool in the cursor toolbar.
Page 8 of 15 AcqKnowledge
®
The zoom tool allows you to select any section of data and enlarge it to examine that area in more detail. To do this,
click the zoom tool and then click and drag the mouse so it forms a box over the desired area. Now, release the mouse
button and you will instantly see the enlarged area (example follows).
Select Zoom Back and Zoom Forward from the Display menu to move through zoom levels. (Or use the keystroke
combination Ctrl+ or Ctrl-.)
To duplicate or remove a selected waveform, choose
Duplicate or Remove waveform from the Edit menu.
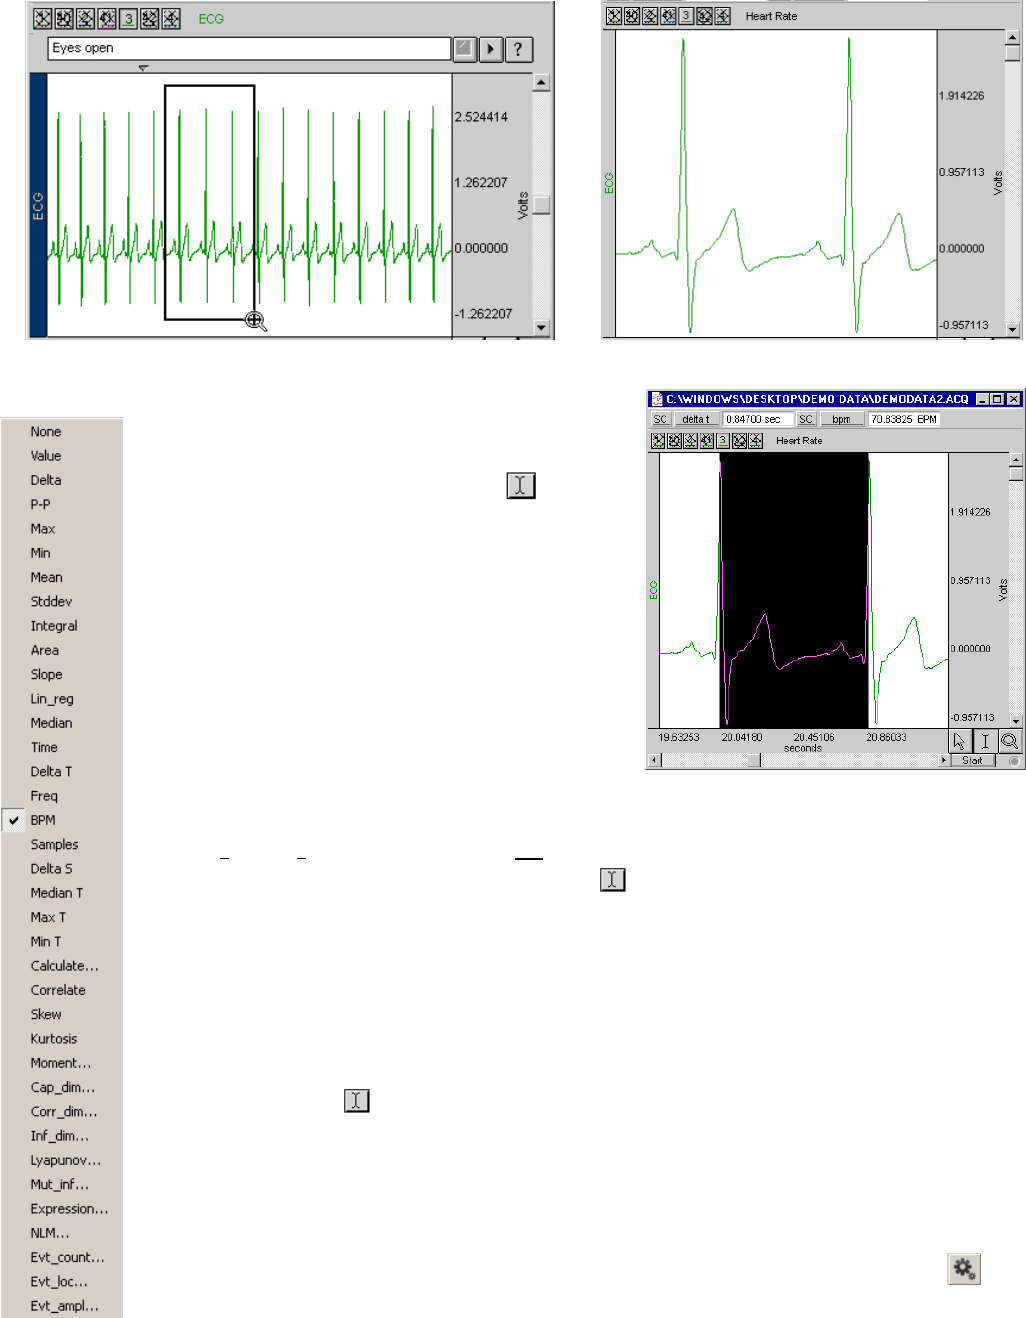
To take specific measurements, click the I-beam
selection tool in the lower corner of the window.
Select a section of the data by clicking and dragging
the cursor across a waveform as shown at right.
In the example at right, the interval between two peaks
is selected. The two peaks occur 0.847 seconds apart,
which results in a BPM of 70.83825 as indicated in the
second result window.
The sample data window shown at right has two
measurement popup menus at the top of the window.
To change the measurement functions, simply click the
popup menu next to the measured value and select a different measurement. To change the channel
each measurement is based on, choose from the SC popup menu. By default, measurements are taken
from the selected channel (as indicated by SC).
The values will change while the measurement tool is being dragged over the waveform. You can
easily measure absolute functions like value, time, and sample number or use functions that operate
over the highlighted area. These include min, max, mean, Delta T, and others.
The measurement features can be automated so that measurements are taken and pasted into the
Journal file when a specific event occurs or at pre-specified, user-selectable time intervals. The Find
Cycle function (under the Analysis menu) will identify specific events based on a variety of threshold
and window descriminators or allow you to enter a time period. In the time period mode, the software
will take the chosen measurement at the defined interval.
The measurement tool is also used to edit waveforms. The highlighted area can be cleared, cut,
copied, or pasted. Data is edited from the selected waveform only. You can copy a section of one
waveform and paste it into another by selecting the destination waveform before pasting it. You can
also perform edits (such as pasting) between windows. To copy an entire waveform from one window
to another, choose Edit > Select All and then choose Edit > Copy, and then switch to the other
window and choose Edit > Insert Waveform.
Choose Display > Preferences > Measurements or click the toolbar’s Preferences button to
modify the measurement display parameters.
WWW.BIOPAC.COM Page 9 of 15
www.biopac.com
Click tab to bring graph to front.
AcqKnowledge offers a number of display options, including X/Y plotting.
You can switch from one display mode to another using the toolbar icons in the
upper left hand corner of the window.
Scope, Chart, X/Y, and Overlap display mode icons
By clicking these icons, your display can alternately emulate a chart recorder or
oscilloscope, or you can plot data from one channel against data from another
channel. You can also overlap appended data segments to simplify comparison
(requires acquisition setup for append). X/Y plots are useful for respiration
studies, vectorcardiograms, and investigations into non-linear dynamics.
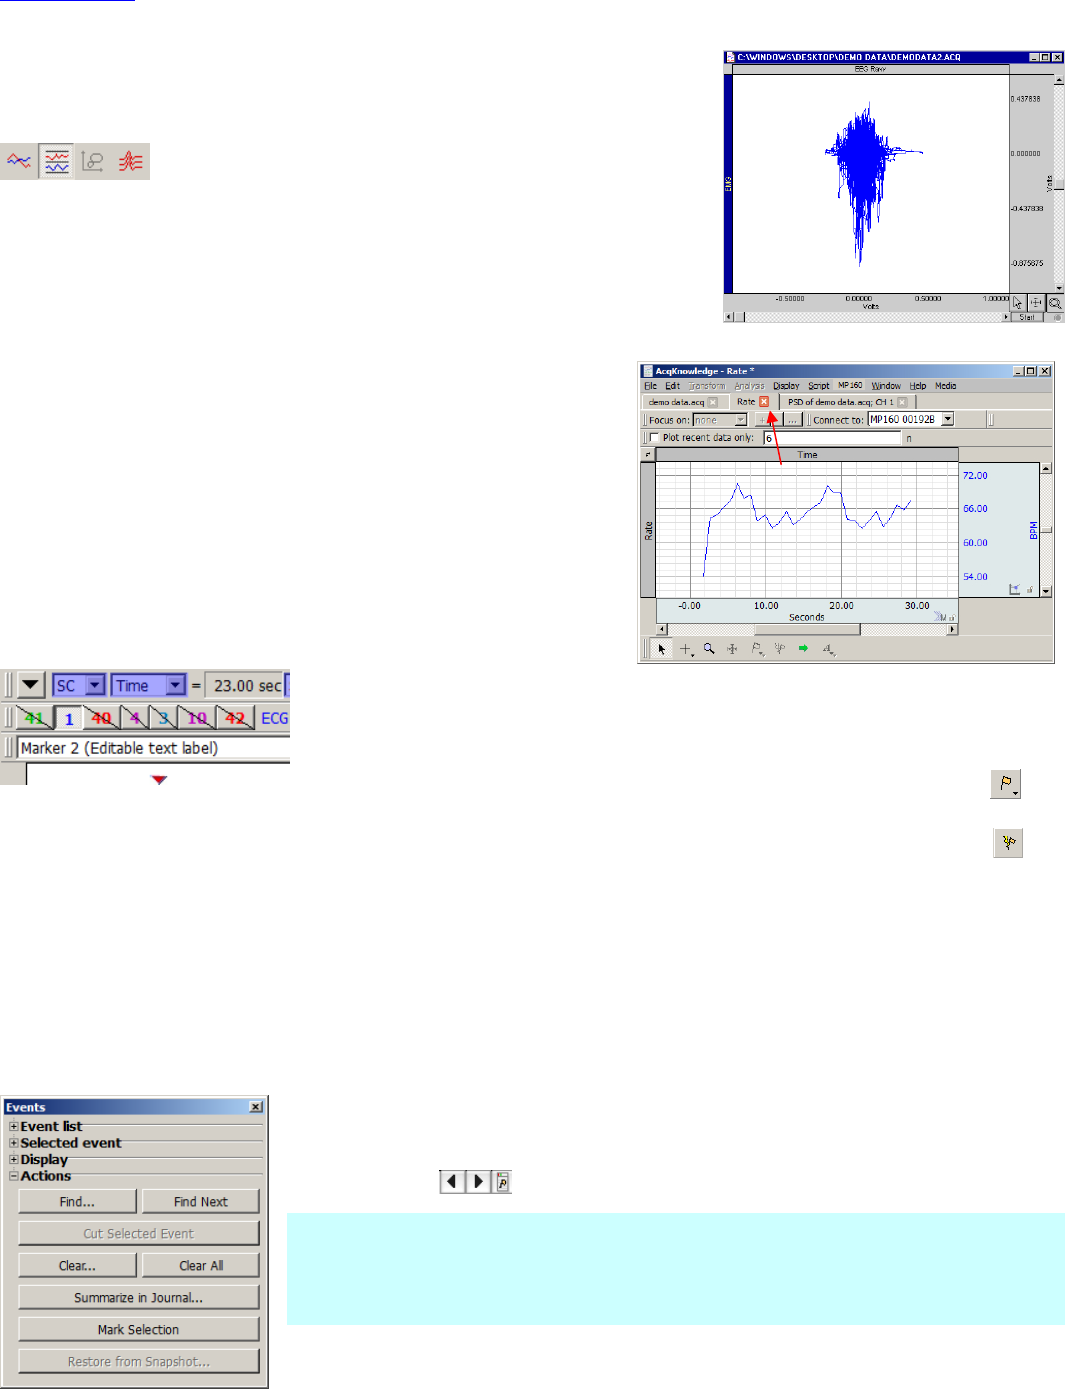
The software allows you to display several files on the screen at one time. Simply choose File > Open and make your
selection. The windows can be displayed as windowed or tabbed, and
moved and resized to ease in viewing. Clicking on the window or tab
brings it to the front. This is very useful for comparing files.
· For more detailed display options, read about modes and
Data Views in the AcqKnowledge Software Guide available
under the software Help menu.
For some experiments, you may need to mark when an event occurs. To do
this, use the on-screen event marker feature. With an open graph window (in
Chart or Scope mode), choose Display > Show > Events and Display > Show
> Event Bar to activate the event marker display region near the top of the
graph window. A wide range of event types can be added by clicking the
toolbar button, selecting an event type and clicking on the event region just
above the graph data. To remove an event, click the “Zap” toolbar button
and click on the event to be removed.
Each event marker is represented by an icon and can be annotated with text. To
add a new event marker after acquisition, position the cursor in the space
between the bottom of the marker region and the top of the graph and click the
mouse.
To enter a global event marker during an acquisition at exactly the time the key is pressed, use Esc. Use the event
marker tools to jump through the event markers or generate a popup menu that will allow you to search for or delete
specific event markers.
Event markers can be positioned in the event marker bar, on the waveform, at the top
of the plot, on the waveform with an indicator, or on top of the plot with an indicator.
Click the Event Palette icon on the right edge of the Event Tools to review event
marking options .
See the AcqKnowledge Manual under the Help menu for Event setup, control, and
measurement options, including Hotkey setup and automated detection.
Read “User Interface & Context Menu Features” in the complete AcqKnowledge
Manual available under the Help menu for more tips!
Page 10 of 15 AcqKnowledge
®
Powerful Analysis
One advantage of saving data on disk is that you can quickly and easily
perform post-acquisition analyses on your data. AcqKnowledge is as powerful
an analytical tool as it is flexible. What’s more, the software is designed to
provide you with immediate feedback from each operation. Using
AcqKnowledge, you will be able to...
§ Use digital filtering and smoothing.
§ Find patterns within data sets.
§ Automatically find cycles/peaks and calculate rate data.
§ Perform mathematical and statistical operations.
§ Log results and observations to a journal.
§ Mark events during acquisition or analysis.
§ Transform data after it has been acquired.
Read more about analysis, transformations and event marking in the
complete AcqKnowledge Manual available under the Help menu.
View video tutorials and software overviews online at
www.biopac.com/videos.
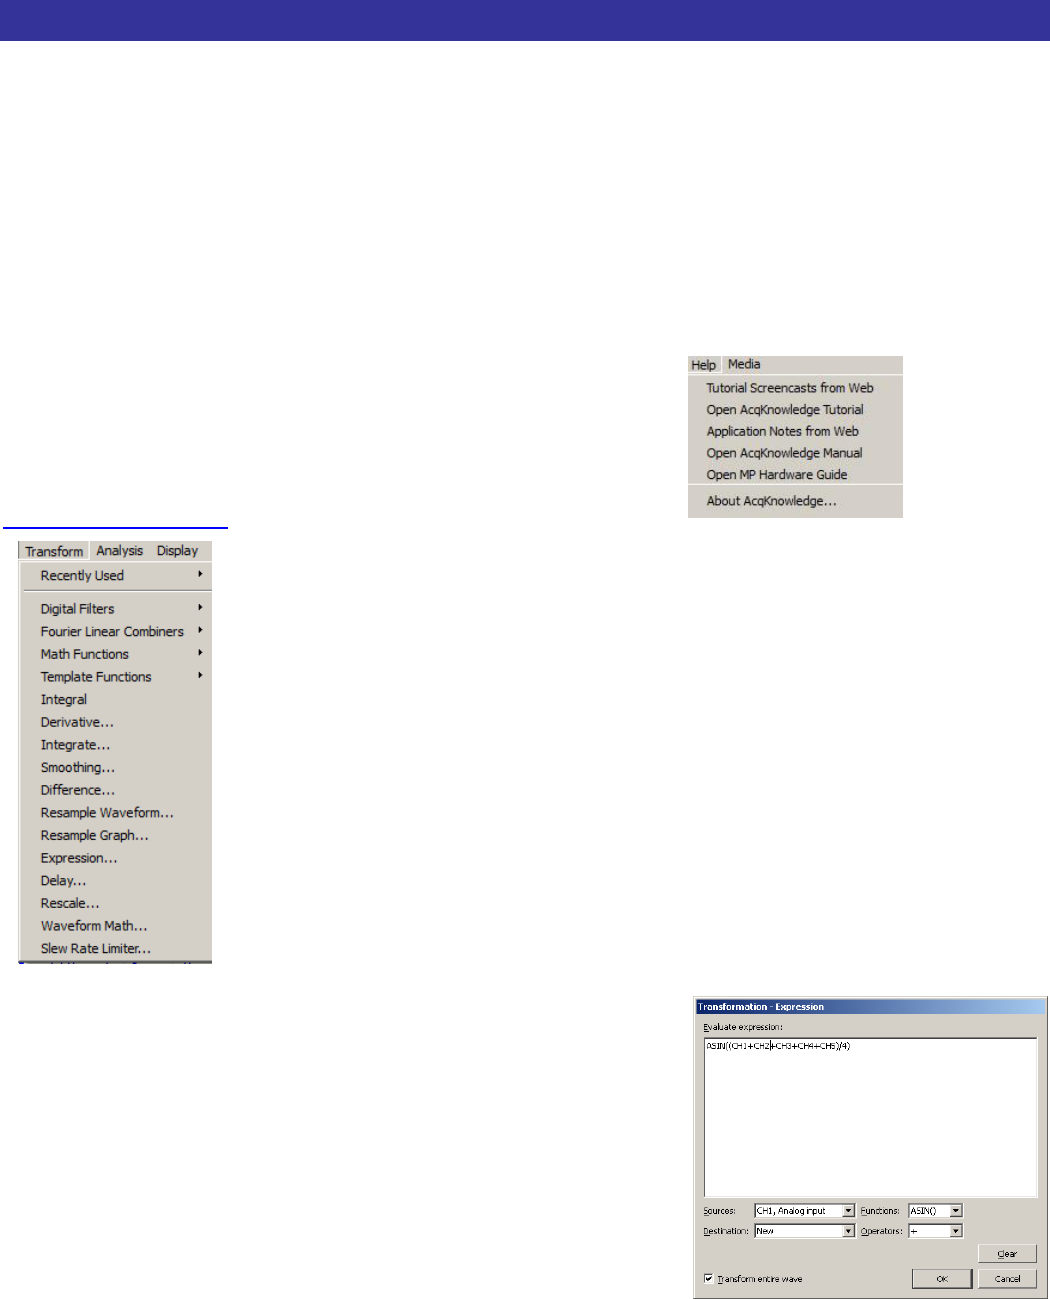
The
Transform
menu
con
tains operations that
modify the data in the graph
after the
recording is completed and opened for analysis.
· Digital Filter has a sub-menu with both FIR and IIR types of filter
operations. For most datasets, the default filter parameters may be used and
will produce relatively robust results.
· Math Functions has a sub-menu with several mathematical transformations;
some transformations will produce a dialog with parameters that can be
changed.
· Template Functions has a sub-menu with options to examine the relationship
between two different waveforms.
· Integral results in a running total of all selected waveform values (using
trapezoidal rule integration).
· Derivative approximates an ideal differentiator. It allows you to specify a low
pass frequency to filter the data prior to performing the derivative.
· Difference is a running subtraction over the number of points specified.
· Expression provides a range of
mathematical operations—from
addition and subtraction to arcsine
and log transformations—to
perform complex operations in a
single step. For example, compute
the mean of channels 1, 2, 3, 4 and
5, and then arcsine transform the
result. Save the output on a new or
existing channel. Transform the
entire waveform or a selected area.
WWW.BIOPAC.COM Page 11 of 15
www.biopac.com
Use over 50 Sample Data files to
further explore the power and
flexibility of AcqKnowledge
software, including the analysis
automation tools.
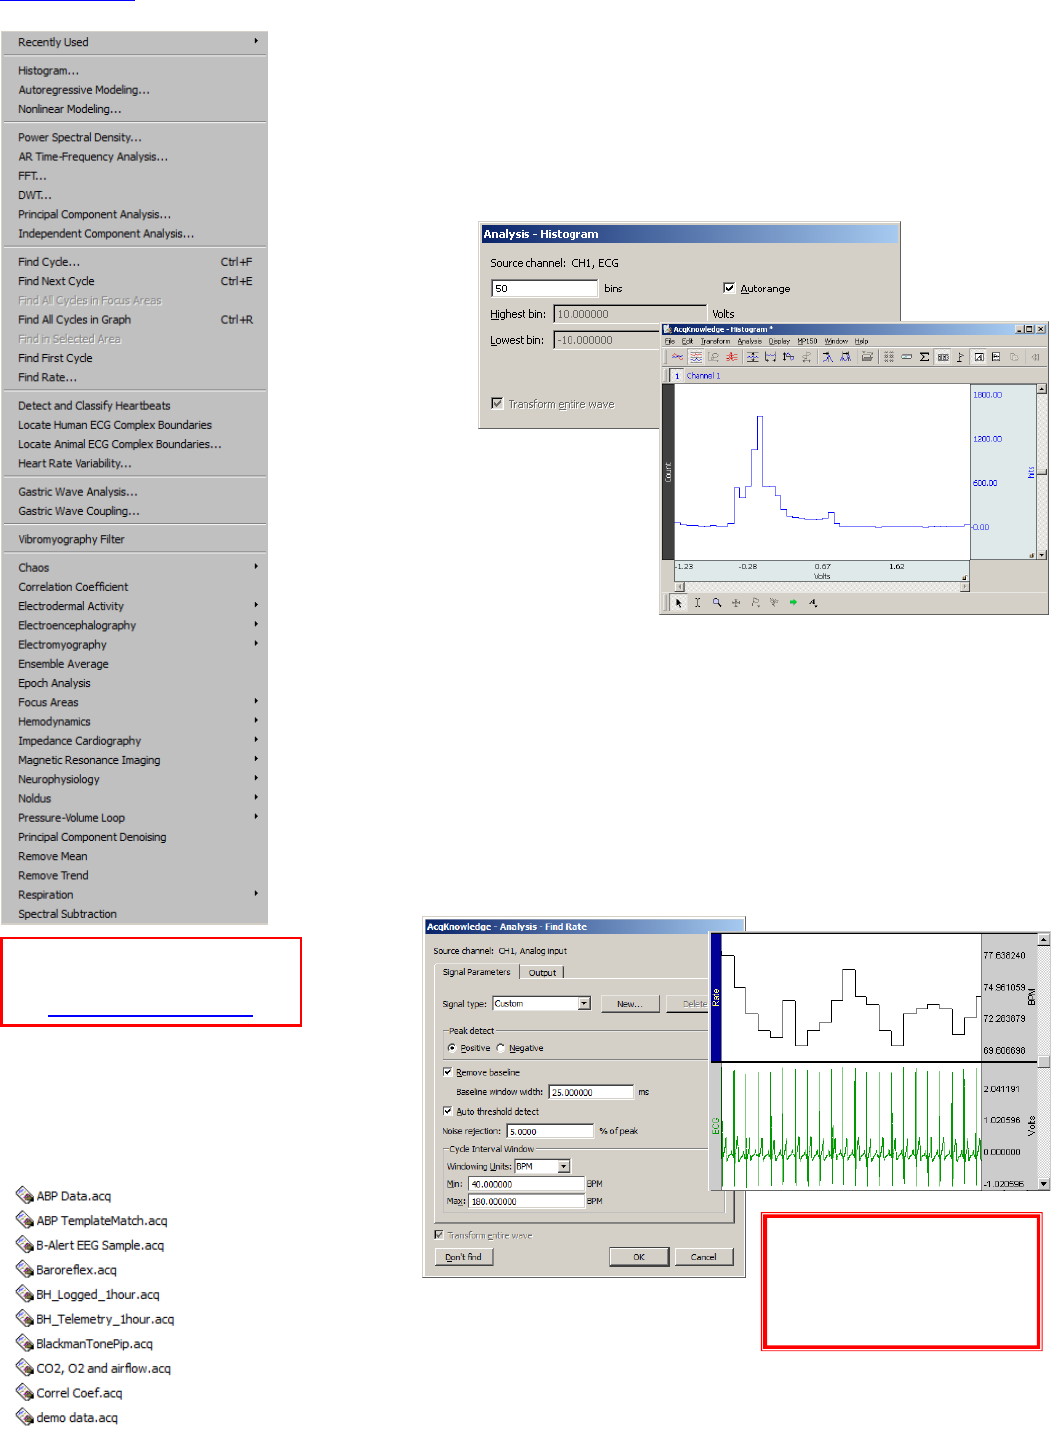
The
Analysis
menu
contains
operations that derive data
and measurements from
the graph.
· Histogram allows you to display data in summary format and examine
the central tendency characteristics and variability within a waveform.
o Enter the number of “bins” to sort the values into. For example,
type “50” in the bins entry and click OK. To set the upper and
lower bounds of the data to be sorted, disable Autorange.
· Find Rate will search for cycle or peaks and calculate rate
information. For example, it will calculate BPM for the entire ECG
waveform.
o Operate as a simple threshold detector or include more
sophisticated parameters such as noise rejection and windowing.
o Calculate the following parameters from a variety of cyclical
data: BPM, Hz, peak max, peak min, P-P, area, and mean.
By default, AcqKnowledge will automatically calculate the threshold
values and compute the rate for the entire waveform, but you can limit
the transformation to a selected area.
Watch detailed Find Peak/Find
Rate video tutorials online at
www.biopac.com/videos
As with almost every
feature in AcqKnowledge,
you can experiment with
different settings to suit
your needs.
Page 12 of 15 AcqKnowledge
®
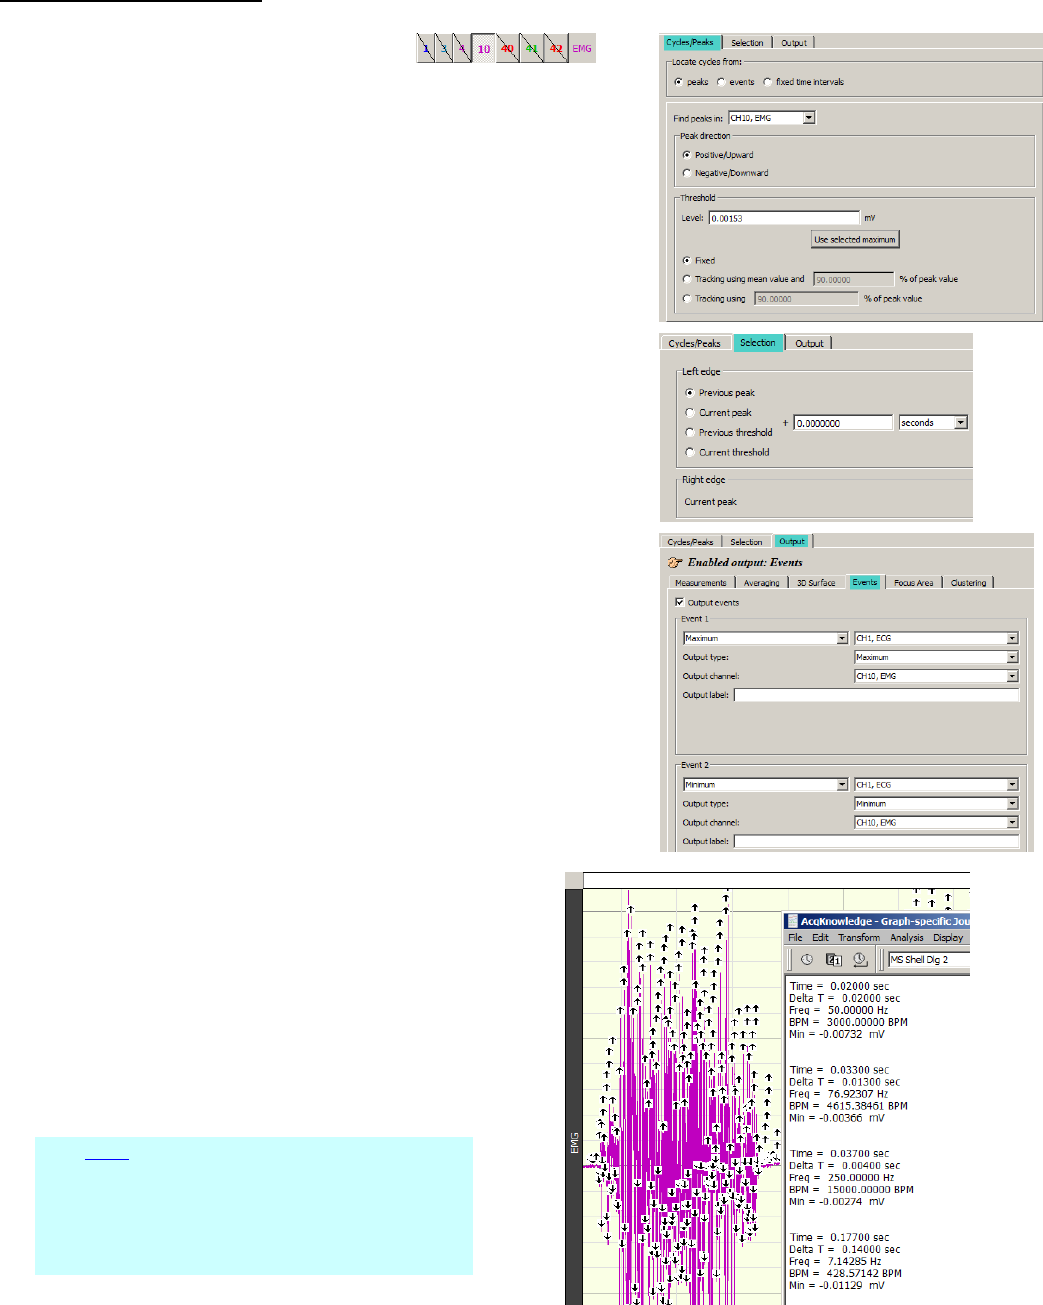
Sample Find Cycle Analysis:
1. Hide all channels except CH 10 EMG.
2. Zoom in on a burst in CH 10 EMG and then use the I-beam
cursor to highlight the area around one typical EMG spike.
3. Select Ctrl-F (or Analysis > Find Cycle) to generate the
Cycle/Peak Detector dialog.
4. Click the Cycles/Peaks tab and set the Threshold Level by
clicking the Use selected maximum button under the entry
box.
5. Click the Selection tab and set Left edge to Previous peak.
6. Click the Output tab.
§ Select the Measurements tab and click Paste measurements
for each cycle to Journal.
§ Select the Events tab.
i. Check the Output events box
ii. Set Event 1 to Maximum on CH 10 EMG for Output type
General > Maximum and output on CH10.
iii. Set Event 2 to minimum on CH 10 EMG for Output type
General > Minimum and output on CH 10.
7. Click OK to close the dialog.
8. Click Find All In Graph.
§ Click Yes if prompted to create a
Journal.
9. Scroll left to the start of the data file.
10. Use the Zoom tool to examine event
definition and placement.
11. Click or display journal to review pasted
event text.
Click here to watch a web screencast of various
Find Cycle operations.
Read more about transformations and event
marking in the complete AcqKnowledge
Manual available under the Help menu.
WWW.BIOPAC.COM Page 13 of 15
www.biopac.com
You can print out waveforms as seen on the screen by
selecting File > Print. The AcqKnowledge software
supports standard output devices (printers, plotters) and can
produce high-resolution plots on virtually any printer.
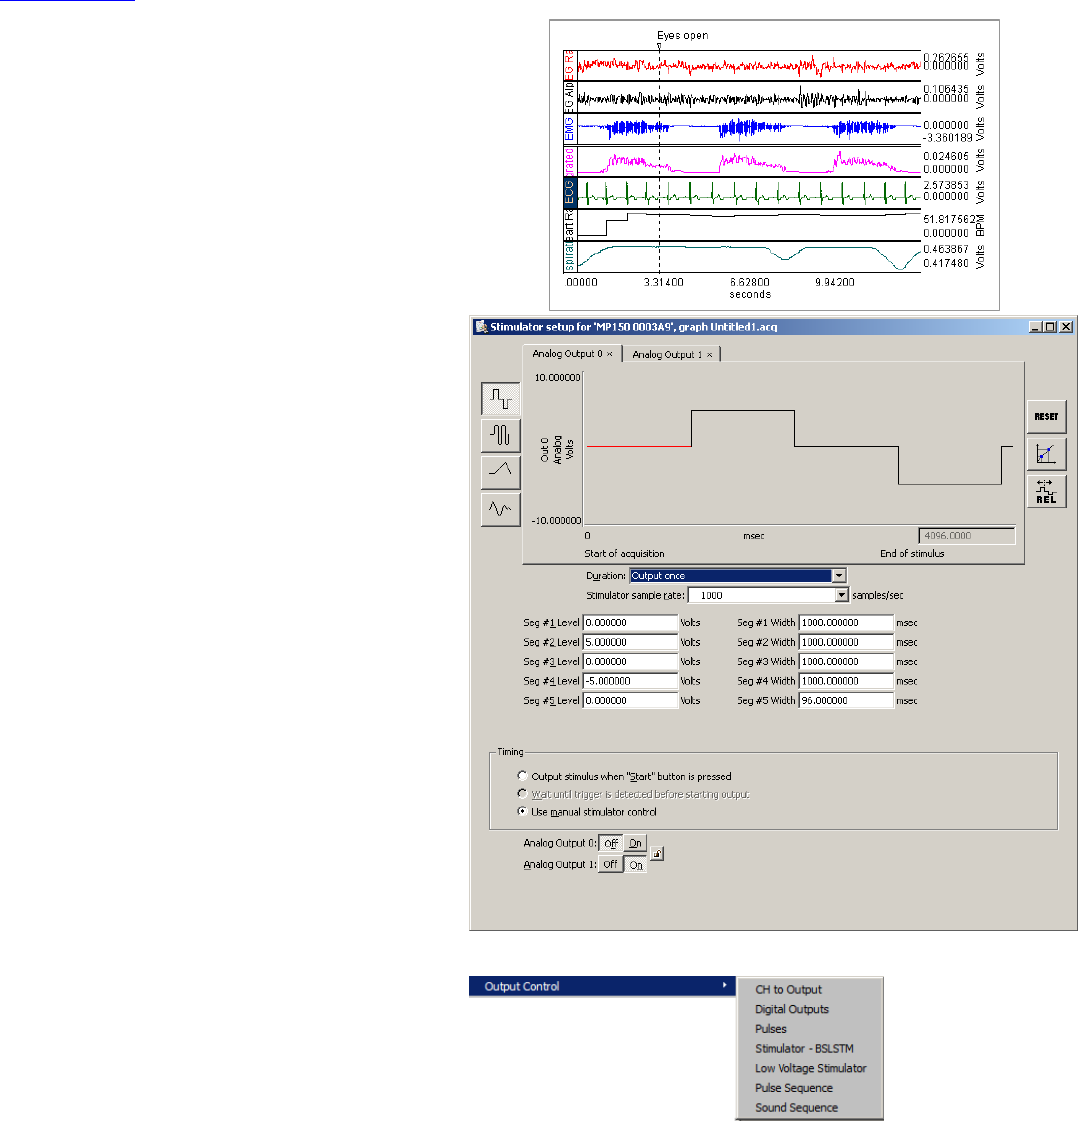
AcqKnowledge also includes tools that allow you
to work more efficiently. One such tool is the
Stimulator Setup dialog, which is useful for
creating stimulus signals and other types of output
signals.
The Stimulator Setup dialog allows you to choose
from a number of “pre-shaped” waveforms,
including pure tones, square waves, and ramp
waves. You can also use the arbitrary waveform
option to output more complex waveforms.
To see this feature, exit Playback Mode
(MP160/150 > Exit Playback Mode) and close the
demo file. An MP160/150 connection is required
to enable all options.
Choose MP160/150 > Set Up Data Acquisition >
Stimulator. Select Output once from the
Duration menu.
This enables the output options and displays a
square wave (which is the default). You can easily
change the type of output waveform by clicking
the Waveform icons in the dialog box. To alter the
characteristics of the signal (duration, amplitude,
magnitude, frequency, phase, etc.), type in new
values in the text boxes below the waveform or
drag a waveform segment in the dialog display.
For AcqKnowledge with MP36R hardware,
stimulator functions are controlled via the MP >
Output Control menu. For further details on
using this feature, see the AcqKnowledge
Software Guide.
Page 14 of 15 AcqKnowledge
®
Setting Up to Record Data
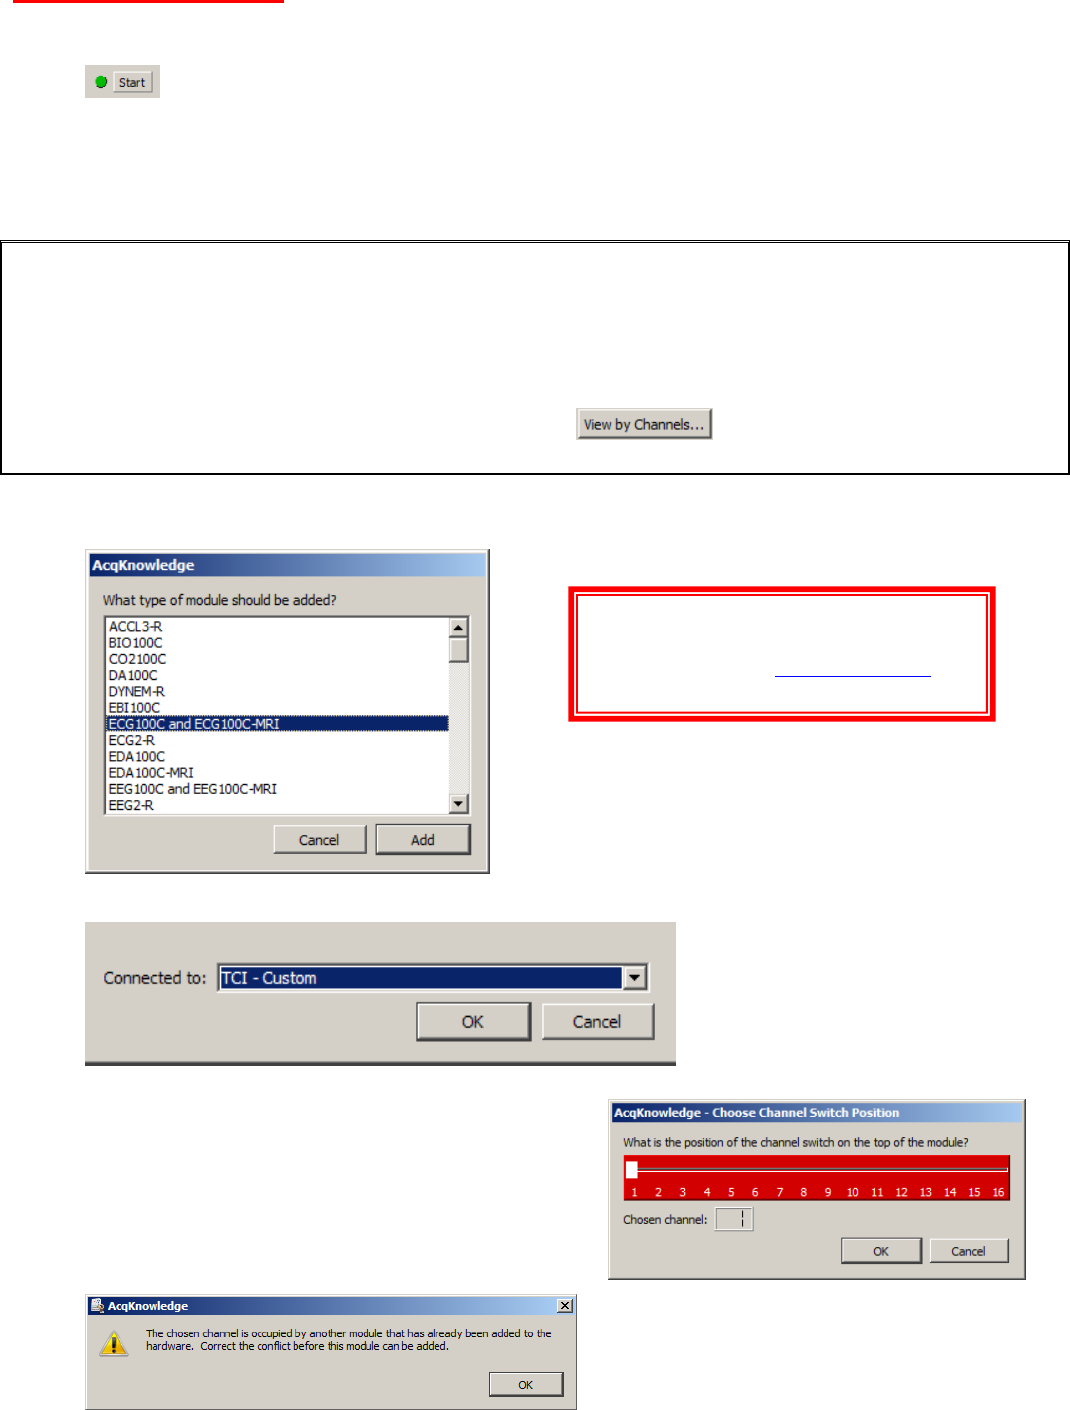
1. Exit Playback Mode by choosing “MP menu > Playback > Exit Playback Mode.” The “Playback” menu item
will revert to show the currently-connected MP hardware type and the “Replay” button will be replaced by the
button. (Transducers, MP Hardware and associated amplifiers must be connected to record
physiological data. See the MP Hardware Guide and AcqKnowledge 4 Software Guide for details about setup
for the type of data you wish to collect.)
2. Close the Demo Data file by clicking the graphs “close” button (X) or by choosing “File > Close.”
3. Choose “Create/Record a new experiment” in the Startup Wizard.
For MP160 and MP150 hardware, AcqKnowledge features a module-oriented setup option called “View by
Modules.” In this mode, guided prompts show the user to add modules/transducers and establish necessary
parameters. In addition, the module setup detects potential channel conflicts between the software channel assignment
and the module’s channel switch setting, and scales the signal to the correct value and units. This module setup mode
is presented by default when AcqKnowledge is launched using the “Create/Record a new experiment” option. This
can greatly assist in expediting proper setup of the connected BIOPAC equipment.
If desired, you may cancel guided module setup and choose the option to set up the acquisition and
graph channels manually. For more details, see page 15. To continue with guided module setup, go to Step 4.
4. Select a module and click Add. (The ECG100C module selected below is an example only. It may not match
the module you are using.)
5. If prompted, select a transducer and click Add.
6. If prompted, input the channel switch settings from the
selected module.
Set the choose channel switch to the number set on the
top of the module (some modules, such as the
OXY100C, have a switch on the front).
Setup detects any potential channel conflicts between
software assignment and the module’s channel switch
position (see below warning dialog).
For a video overview on setting up
channels for wired, wireless, and specialty
amplifiers visit our YouTube channel for
online tutorials.
WWW.BIOPAC.COM Page 15 of 15
www.biopac.com
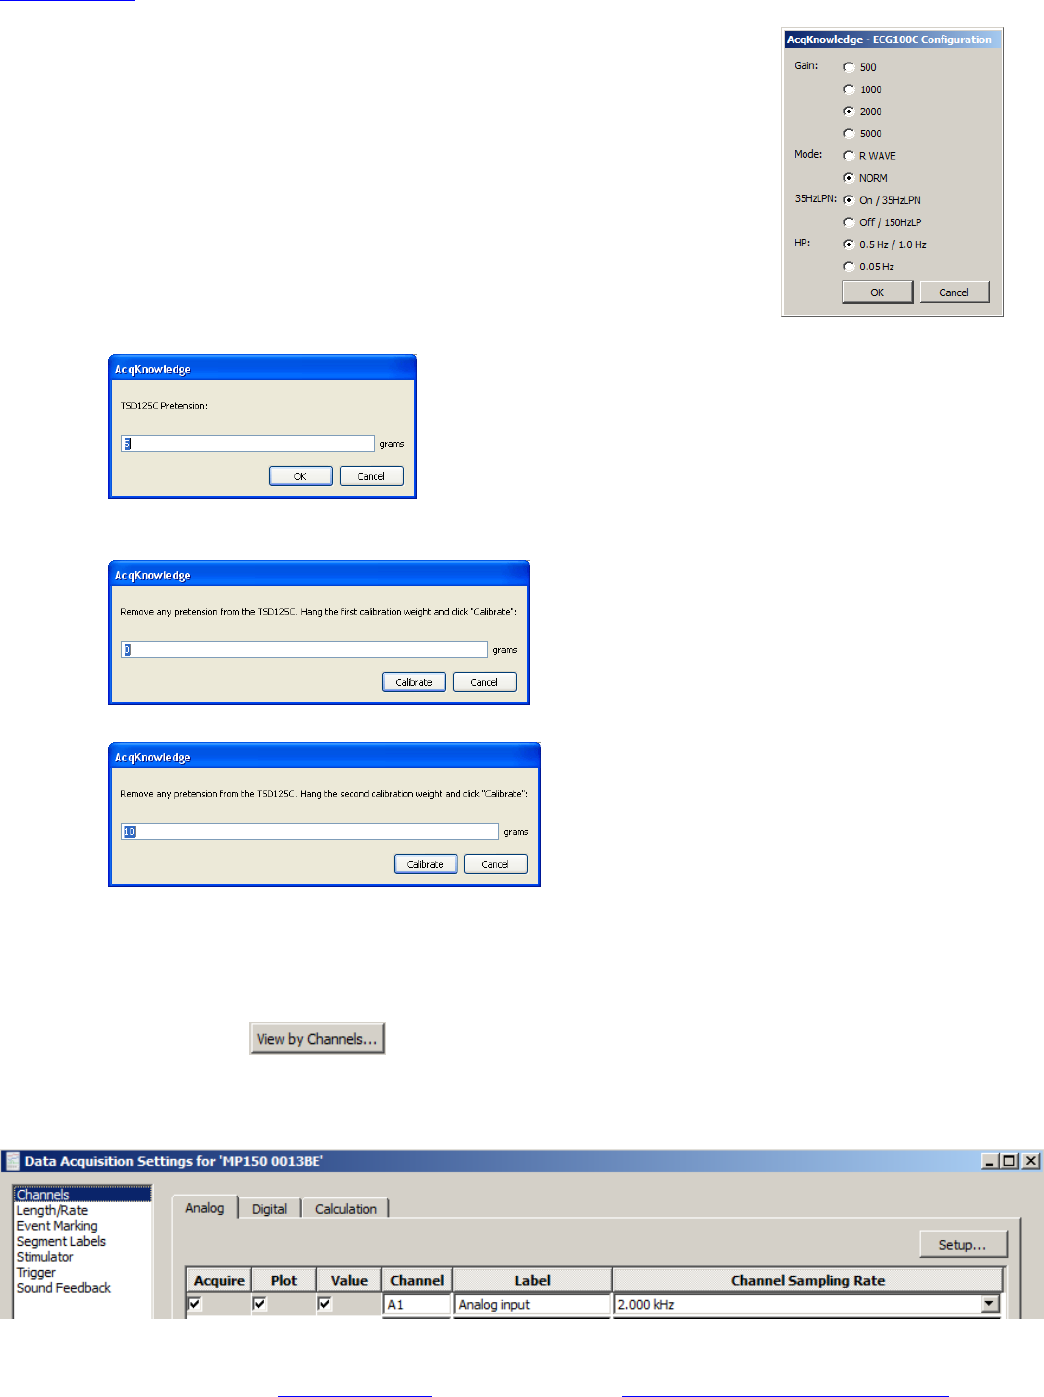
7. Establish the configuration for gain and filters as shown on right and click
OK. It is important to set the Gain and Filter settings to match the switch
settings on the amplifier. The software uses this information to scale the
signal to the correct units. If the Gain is not set to match, the signal will be
scaled incorrectly.
8. Perform calibration steps, if required. The software will automatically scale
certain signals if they only require a zero setting. However, some signals
require a two-point calibration. In this case, the software will generate
additional prompts for the scale values.
The following example shows the dialogs for setting up a TSD125 force
transducer.
a. The software prompts the user for pretension amount; enter “0” if pretension is not required.
b. Enter a low calibration value or “0” if calibrating between zero and a second weight, and then click
“calibrate” to take a voltage reading.
c. Enter a high calibration value and then click Calibrate to take a voltage reading.
Note: When recording is started, the data may show an offset. This offset is the amount that was entered in
the pretension dialog. Adjust the tension applied to the transducer to center the signal on zero.
Using this information, the module setup automatically sets the scaling and initial visual range to match the physical
input units from the module or transducer.
The manual set up option is . In this display, three columns of boxes appear next to text boxes
describing the channel, label and sample rate information. To collect and plot sample data for a given channel, enable
the Acquire and Plot columns for that channel. Then add any Calculation channels and set the Length/Rate
(acquisition parameters) as desired. Once established, you are ready to record using those parameters.
Please contact us to discuss how BIOPAC can provide you with solutions for life science data acquisition and
analysis, or visit our website at www.biopac.com. Please also visit the Demo Video and Tutorial Screencast section of
the website for comprehensive video tutorials and hardware demos.
